Wednesday, May 18, 2011

Go there... now!

Sunday, November 01, 2009

Karmic - Ubuntu 9.10

Ok, so time to upgrade to 9.10 has come but here are two things to poimt out that effected me:

Firstly, if you're using the 180... nVidia drivers, it's likely there will be a problem with the installation of the 185 kernel, but don't worry, this sorts itself out during a repair or on reboot automatically, so don't worry about sending a report on it.

Secondly, you may now see that your super cool boot screen has gone and become rather dull... but never fear, it's actually become a bit more powerful, it's just that the tools to edit it normally aren't available just yet.

Here's what you do...
  1. Log out of you account (taking you back to the login screen)
  2. Go to a terminal (i.e. Ctrl + Alt + F1)
  3. Login with your normal account
  4. at the prompt now, type:
    export DISPLAY=:0.0
  5. Now type:
    sudo -u gdm gnome-control-center
  6. Switch back to the gdm screen with Alt + F7
  7. Now you should have the gnome-control-center loaded and ready for you to configure
  8. Click on Appearances and have fun tuning your display
  9. Finally, close it and log back in normally.
Now we just gotta wait for the new customized GDM's to come out, but at least not while looking at a dull login screen.

Saturday, October 03, 2009

WGet for Premium Accounts

So, some of you on Linux may also be like me and want to download from Megaupload or Rapidshare using your premium accounts... but want to be able to do so from a terminal with low overhead... well, here's how ya do it!

The tool of the day is wget and it a wonderfully resourceful piece of code... but now we'll be focussing on using it to download from the above mentioned sites from now on known as 1 (megaupload) and 2 (rapidshare) by alphabetical order.

First thing you will need to do is grab your cookies for your premium accounts. Replace USERNAME and PASSWORD with your accounts details:
  1. wget --save-cookies ~/.cookies/rapidshare --post-data "login=USERNAME&password=PASSWORD" -O - https://ssl.rapidshare.com/cgi-bin/premiumzone.cgi > /dev/null
  2. wget --save-cookies ~/.cookies/megaupload --post-data "login=1&redir=1&username=USERNAME&password=PASSWORD" -O - http://megaupload.com/?c=login > /dev/null
This saves a cookie for each account into your hidden cookie folder... run ls ~.cookies to make sure they're there if you want.

Believe it or not, that's the hard work done... now for the download just use the following replacing URI with the download link:
  1. wget -c --load-cookies .cookies/megaupload URI
  2. wget -c --load-cookies .cookies/rapidshare URI
If you have problems with the megaupload downloads, login to your accoutn and make sure that the direct download option is active.

And that's it... to make it a bit more automated, create a script like so:

Put the following into a file (ie dlfiles) adjusting it where necessary:

#!/bin/bash
wget -c --load-cookies .cookies/megaupload http://www.megaupload.com/s.....

save it and make it executable:

chmod -x dlfiles

And then execute it with ./dlfiles

You can also save all the links to the files you wanted downloaded and use the input option with wget like this replacing LINKLIST with the file containing the URI's to the files you wish to download:

wget -c --load-cookies .cookies/megaupload -i LINKLIST

Later I will be looking into creating a script to run as a download server to almost completely automate the process based on info from this post, but for now, this should do you well!

Tuesday, September 22, 2009

FRAPS Video Conversion

Ok, this is for those of you who use FRAPS to grab video of your gameplay but have had issues converting the files from there...

If you don't konw what FRAPS is, do yourself a favour and look here.
If you don't think just recording game play is a good enough reason, Google machinima (or maybe look for classics like Red vs Blue.)

Info in this post comes mainly from here.


Now this may not be a problem for many, but if you have the issue such as no audio when you convert fraps avi's, this is for you. For some reason, Adobe Premiere (as well as Sony Vegas) does not like the files generated by fraps when they include audio. Here is a quick method to get things in a format that will not cause issues. This was discussed more at length in this thread.

To Setup:

  1. Go download virtualdub at this site: http://www.virtualdub.org/
  2. Extract the folder from the zip and set it on your desktop, or at least make a shortcut to the VeeDub executable. (its VeeDub64 if you downloaded the 64 bit version)
  3. Download and install the Lagarith codec from http://lags.leetcode.net/codec.html (i used the windows installer link)
  4. Run Virtualdub, and go to File>Open Video File>YourFrapsFile.avi
Converting:
  1. Go to Video, select "full processing mode"
  2. Go to Video>Compression
  3. Select Lagarith Lossless Codec and click ok
  4. Go to Audio, then select "direct stream copy"
  5. Go to File, select "Save as AVI" and give it a name
The footage will be slightly larger than the fraps file, but will not be using the fraps codec which sometimes causes issues in editing programs such as Sony Vegas and Adobe Premiere.

So that's that, feel free to convert or use it however you want now... like I did here, taking 1 gig of good graphics and bad driving and converting it to a 20mb flash video :)

Labels:

Saturday, September 19, 2009

Partition change boot repair...

OK, so it may not be the most common thing you would do, but I had left an area of my hard disk empty and without partitioned so that when I had settled in, I could use it for whatever would benefit most from the space.

Now, the setup of my main boot disk was as follows:
  • Partition 1 - Windows Vista C:
  • Above mentioned empty space
  • Partition 2 - Ubuntu Studio
  • Extended Partition:
    Linux Swap Partition
    Gaming Partition G:
So, I then without a care in the world quickly added a B: for documents in the space mentioned... moved all my locations and files there... and shut down.

The fun started the next day... Of course, as I am multi-booting, I use a Linux boot manager... they just can't be beaten... GRUB being the system of choice for Ubuntu.
Now, only when the Grub menu puts out nothing but an error did I realise what I had just done... (the error didn't really help.. it was just then that I worked it out;) Linux including the Grub files, according the the hard disc, are now not on partition 2... but partition 3.

Phew.. glad I knew that... now, how to fix it.
I'll skip the things I tried with my USB live dists and the like and go straight to the solution I think:

  1. Pop in your installation disk and boot to it (if you don't have it any more.. download a new one... it's Linux for goodness sake :)
  2. Choose the recovery option and then open a console on the partition of your linux installation (you should know this, having just edited the partition)
  3. If use an older version of grub you will first need to edit your menu.lst file to point to the correct partitions.
  4. Finally, just reinstall Grub. In the following example, my linux root is sda3 and sda is the boot disk:
    sudo grub > root (hd0,2)
    > setup (hd0)
    > quit
  5. Now just reboot and breath a sigh of relief :)

Labels:

Monday, July 20, 2009

TorrentFlux and download accounts


(From HERE):


In TorrentFlux, you may have noticed that adding torrents by URL doesn’t usually work; at least not with private trackers. Don’t worry - TorrentFlux isn’t to blame. This is a security measure implemented by the private site, and help

s protect against passkey theft and other issues. Even if you supplied a proper URL (with your passkey in it), it likely still won’t work. The solution? - You need to add the private tracker to TorrentFlux through the "Cookie Management" feature.


Downloading torrents directly from a URL can also help in situations where you’re able to use your seedbox and private tracker from a remote computer, but you can’t download the actual torrent files. For instance some Universities, non-commercial ISPs & corporate firewalls at the workplace may block access to torrent files, even if you have no intention of using a BitTorrent client on that computer. You’ll still be blocked from saving those torrent files to disk, and thus unable to add them to your seedbox. To circumvent this, simply add the torrent from the URL of your private tracker - but you’ll need to set up that tracker in Cookie Management, first.

Cookie Management

Here are the procedures to adding a private tracker to TorrentFlux:

In the main TorrentFlux window, click on "Profile" at the top right. Once in your profile, click on "Cookie Management".


You’ll need to supply two fields of data from the cookie of your private tracker. They are:

Host: (this is the URL of the private tracker, i.e. "www.torrentleech.org")

Data: (this is the "UID" and "PASS" from the cookie) in this format:

uid=123456;pass=0j9i8h7g6f5e4d3c2b1a

The first part "Host" is simple enough. This second part takes a little more effort.

Cookie Management - Firefox

To find your "uid" and "pass", you’ll need to look at your cookies in Firefox.

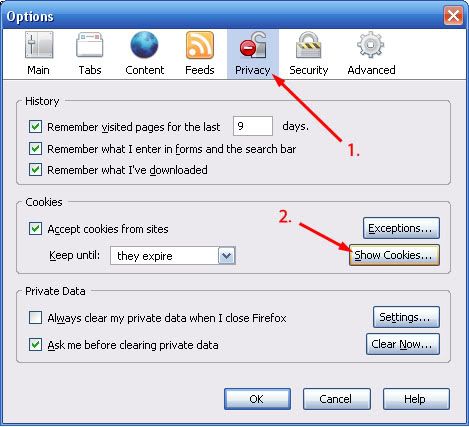
1. Launch Firefox, and go to the TOOLS > OPTIONS… menu. Now, click on the Privacy icon, and click "Show Cookies":

2. In the ‘Cookies’ window, scroll down to the name of your private tracker that you wish to add to TorrentFlux. For this example, we’ve used TorrentLeech.org. Once found, click the "plus" (+) icon to open up the list of cookies (or just double-click the folder). You should now see something like this:


(If there is no cookie listed for your private tracker, go and logon to your account. This will generate a cookie - close the Firefox options window and go back to Step 1.)

3. Again, the two things you need for Cookie Management (DATA) is the "uid" and the "pass". You should notice that there are two cookies for both of these:


3A. Click the first cookie, called "pass" - you should now notice the information for the cookie is displayed at the bottom of the window.

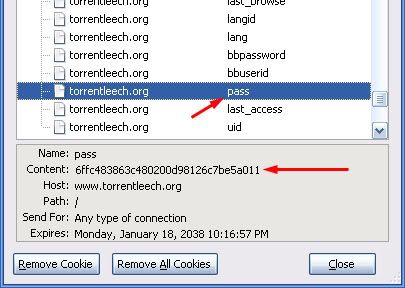
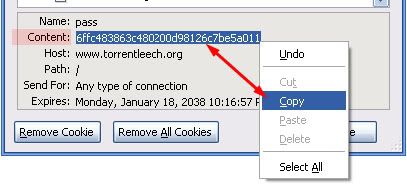
Where it says "Content:" - highlight the text string, right-click and copy it. ‘Paste’ it into a text file. Also notice where is says "Host:" - make a note of it. It will be required for the Host part in Cookie Management back in TorrentFlux.

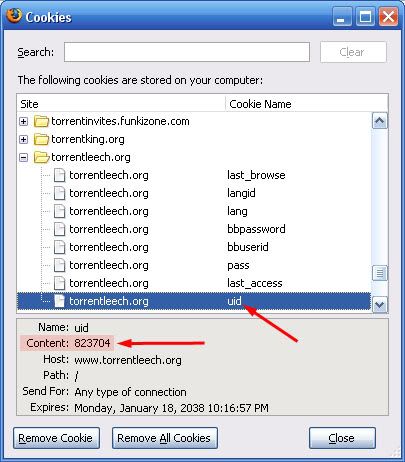
3B. Click the second cookie, called "uid" - you should now notice the information is also displayed at the bottom of the window. Repeating the steps from 3A, copy this 6-digit number next to Content:. Again, save it to your text file.

3C. Arrange the two strings that you pasted into your text file, so that it appears like below. Be sure to add the "uid=" and "pass=" before each one, and that you separate them with a semi-colon. Highlight the entire line, and "copy" it to the clipboard.

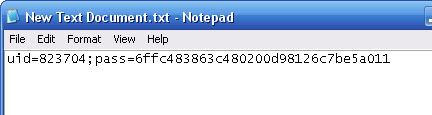
4. Go back to the Cookie Management window, and enter the Host (i.e. www.torrentleech.org) and enter the text from 3C in the Data field, as shown below. Click the "Add" button to finalize. The new cookie should now be listed.

Done! You should now (in some cases) be able to add torrents through the "URL for the Torrent File" feature (without generating error messages).

Applying the URL Feature:

Visit your private tracker, and go into the "details" for a torrent. Right-click the torrent title, and (in Firefox) select "Copy Link Location…".


Go back to the main TorrentFlux window, and ‘paste’ the URL into the field where it says "URL for the Torrent File". Click the "Go" button to start the torrent as normal.

Labels:

Saturday, June 13, 2009

Shunt

Shunt is just awesome... had to just say it.
It's essentially a part club, part art gallery/studio... sorta like thing, hehe.

Here's a bit of my experience tonight... well, last night now I guess:

The entrance leads you into a room lined with mathematical equations, walls, ceiling and all... After leaving We have a look a some photography and models made with general household objects...

While there I was promptly directed away and alone into a room and locked in to what was to be an all out interrogation.. luckily, headphones you wear give your responses so don[t have to do the talking, but the atmosphere just great.

After I got out, I was locked in a room to lie in a hammock watching nebula photos with space shuttle transmissions playing over really relaxing background music. Even got a ticket for the ride :)

Pity I didn't get any pictures of those, but next after walking farther down, the corridor seems to go one forever (more so than I remember) but as we get closer we see the next piece:


Next it's through a dark room, spot lights focusing on a flower set in glass...

I know.. the photos aren't great... my phone camera is the best I got at the moment, sorry.

Anyway, to cut a long story short... it's gotta be the best night out to be had in London... and the cherry on top; each time it's different!

To finish off I'll just add a few more pics of what I could get a shot of:


A representation of our solar system... with random objects; soccer ball, snooker ball, marble...

One of the live bands playing on one of the stages


Sexy steamed up windows or a morbid picture of an end... you decide.


Love letters from heaven.... or at least above the doorway to be specific.

A bit of jazz near another bar


The library.. I mean, main bar :)


A corner of the main dance floor... terrible pic again... sorry.

Anyway, to really understand, you just have to go!